Victorian properties are known for having amazing character – detailed coving, stained glass windows, etc. You know what they aren’t known for? Storage! I’m guessing that the Victorians really loved free-standing wardrobes because they definitely weren’t fans of closets.
Our flat isn’t exactly spacious. Don’t get me wrong, it could be smaller, but the only storage we have (besides our bedroom wardrobe) is one tiny closet in the hallway.
I wanted someplace to store books, computers, cables/cords… and plants! I wanted more plants! Oh, and whatever it was had to fit perfectly between our living room doorway and TV cabinet.

I started hunting around for a perfect bookshelf – something visually open, interesting and tall. Our flat might not be big in square meters, but it has really high ceilings – why not make the most of them? Since this bookshelf was going beside the doorway, the shelves couldn’t block sight lines into the room. Hence my ‘open’ requirement.
The perfect bookshelf was the helix from CB2. But, not only did I want it to be cheaper (international shipping and all), I also wanted it to be wider and taller. I figured that it couldn’t be too hard to make something similar myself – after all, it’s just a couple of metal poles and wood, right?
Well… nothing’s ever easy, is it?
I found a website that not only supplied the metal I needed but would even cut the mitre corners for the top! Cool right? They also had metal lugs that I could get welded on as shelf supports. Now, all I needed was someone to weld those 16 joins (for the corners, and attaching the lugs).
I started asking local metal fabricators but the quotes I got were insane! I mean, the metal was going to be delivered to them, already cut to size – they just had to weld it. They were trying to charge £200 to make 16 weld joins. Bat-shit crazy…
So I put it off to the side and kind of forgot about it for a while, until I had an epiphany. There are other jobs that use welding! And, because building custom furniture or railings isn’t their 9-5, they might not try to rip me off! So I called up a local auto-body shop and managed to secure the work for only £30! Boo-yah! To finish them off, all it took was a couple coats of primer and black spray paint.
Next up, came the wood. Which threw another wrench into the works.
See, I wanted the shelves to be 30cm wide, which it turns out, is wider than standard planks of wood. I searched high and low but anything wider than 20cm was expensive. So I decided to go with plywood! I knew that I could add wood edging (which I used to make the bedside tables) to make it look like solid wood, but I kind of liked the plywood edges.
I looked around for a place that would not only supply large enough sheets of the right grade plywood but would cut it down into my shelf size. That’s when I discovered Builder Depot and boy, do I wish they had a location closer to me! I have lots of projects in mind…
The first time we went, I didn’t call ahead of time and they were out of the birch ply I was planning to use. I had already been toying with using marine grade (looked nice in photos), so figured I would just give that a shot. It ended up being a nightmare. The edges just splintered when I tried to sand them smooth, not to mention the stain looked awful. So I managed to convince Richard to drive me all the way back another weekend for the birch ply – it made all the difference.
Seriously, the stuff is amazing – it’s no wonder they use it to build kitchen cabinets etc. The edges are neat when you cut it and you can sand it without wearing away the top layer.
To construct the shelves (which the helpful staff at Builder Depot cut at 30cm x 100cm) all I had to do was cut a little notch to allow the metal to sit flush with the edge. I measured my metal posts, marked the square, and cut it very carefully with a jigsaw. It took some time to do each one, as I had to sort of cut it away in triangles a bit at a time.
After cutting, the shelves got good sand and some Danish oil! As I was worried about the colour looking blotchy, I did a couple of coats with clear oil first. I figured it could soak into the grain and ensure that it didn’t absorb too much pigment in the later oils. Then I did a couple passes with a mixture of Canadian Cedar and Jacobean Dark Oak. I tested both colours on some scrap plywood and decided something halfway between would be the best match to the existing wood in the room. Once the colour was dark enough, I let them all dry completely before varnishing.
Side note – I can’t wait to have a garage or somewhere to do stuff like this! We ended up taking them to my brother-in-law’s place, as they had some room in their garage we could use.
Now, one thing I didn’t do a great job of, was choosing the best birch ply sheet. The stuff they had in stock wasn’t the same grade on both sides (BB and C) which meant that some sheets had lots of these patches anywhere there was a knot on the one side. I hate being picky when someone has to forklift sheets down for me, going through them until I find ‘the one’, so I kind of settled on what I thought was good enough. Well, the stain really highlights those patches! It’s not the end of the world though – I made sure that they were either on the underside of a lower shelf or the topside of the higher ones. You never see them! But if you’re doing anything similar, learn from my mistake. Be that annoying perfectionist going through an entire stack of plywood!
Now that I had everything ready to go, it was just a matter of putting it all together. The metal supports got these plugs to go in the bottom so they wouldn’t scratch the floor and then I just had to attach the shelves.
I found screws that were short enough that they didn’t go all the way through the plywood; unfortunately, the holes on the lugs were a bit wider than the screw heads. To compensate, I picked up some washers and sprayed them black to match the screws. Then it was a simple job of attaching the shelves by screwing through the lugs, making sure to put the shelves in the right order (to hide the patches).
Finally, we stood them up, measured and marked the holes for the wall, and drilled in some drywall anchors. The studs would have been great, but the placement of the shelf didn’t line up with any. We used some spare butterfly anchors we had and I painted the heads black to match.
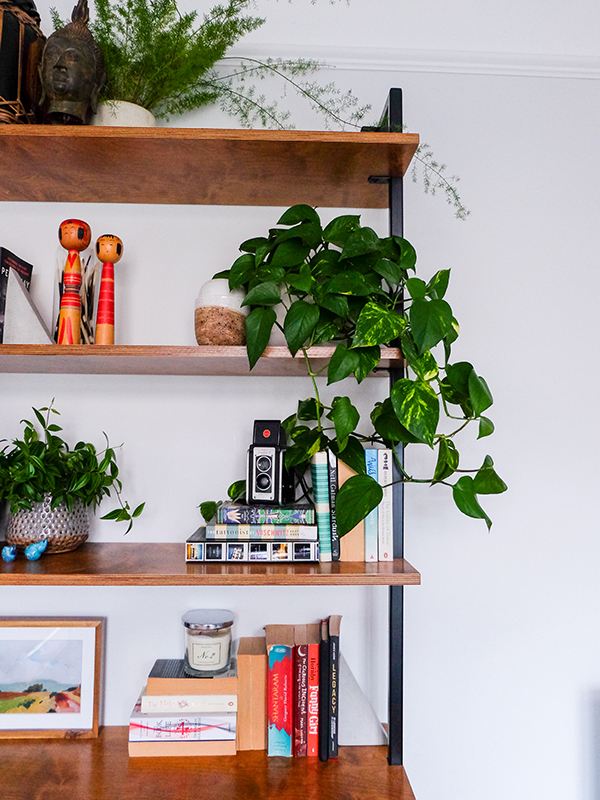
And that’s it! It took a long time to actually get these shelves up, what with finding the right welder and getting the wrong wood at first, but I’m so happy with them! They fit the space perfectly – adding much-needed surface area for all my books and plants. (Not to mention the booze and computers/random cables hidden in those baskets.)
What do you guys think? Feeling inspired to find a local welder of your own? Now that you know my mistake’s secrets, give it a shot!